
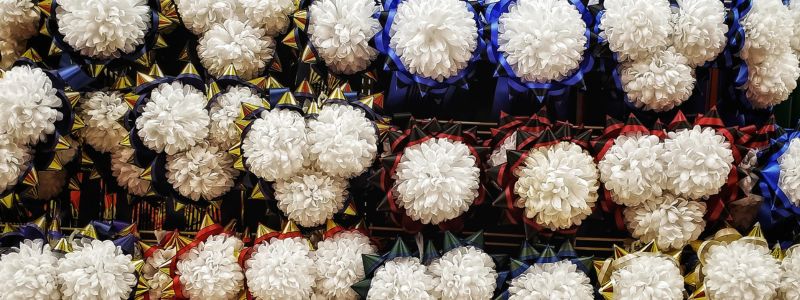
Homecoming is one of the most anticipated events of the year for high school students, especially in Texas. While the big football game and dance are at the center of the celebration, one tradition stands out: the homecoming mum. These ornate, eye-catching creations are a hallmark of Texas homecoming culture, worn proudly by students to show school spirit and personal flair. While you can purchase a pre-made mum, many people love making their own, allowing for a fully personalized and creative expression.
If you’re ready to dive into the world of crafting homecoming mums, this step-by-step guide will help you create a stunning, custom masterpiece that will impress you!
What You’ll Need to Make a Homecoming Mum
Before you start, it’s essential to gather all the necessary supplies. Craft stores, like Michaels, especially in Texas, typically stock everything you’ll need in the weeks leading up to homecoming. Here’s a basic list to get you started:
Materials:
- Artificial Chrysanthemum Flower (usually large, white, and the centerpiece of the mum)
- Mum Backer (sturdy cardboard or plastic disc for the base)
- Ribbons in various colors (usually in your school’s colors)
- Decorative Accents: bells, trinkets, beads, glitter, charms, and stuffed animals
- Lettering Stickers for names or school initials
- Hot Glue Gun and Glue Sticks
- Stapler and Staples
- Scissors
- Lights (optional, battery-powered LED lights are a fun touch)
Optional Extras:
- Feathers, Tulle, or Netting for added flair
- Chains or Beads for extra dimension
- Monograms or Initials for personalization
Step 1: Select Your Mum’s Colors and Theme
Before you begin assembling your mum, deciding on a color scheme and theme is important. Typically, homecoming mums are made using the school’s colors (such as blue and gold, red and black, etc.). However, many students like to add personal touches, such as including their favorite color or incorporating a specific theme, like sports, cheerleading, or band.

When choosing mum decorations, you can also consider any activities or clubs the student is involved in. For example, if the student plays football or is in the marching band, you can add football charms or mini-musical instruments.
Step 2: Prepare the Flower and Backer
The chrysanthemum flower is the focal point of the mum, and you’ll want to start by attaching it to the backer (the cardboard or plastic base). Here’s how to prepare it:
1. Fluff the Flower: Artificial flowers can be squished when you first buy them, so take a moment to fluff the petals. You want the flower to look full and vibrant.
2. Attach the Flower to the Backer: Using your hot glue gun, apply a generous amount of glue to the back of the flower and press it firmly onto the center of the backer. For added security, staple the base of the flower to the backer as well. This will serve as the sturdy foundation of your mum.
Step 3: Add Ribbons
Ribbons are a key component of any mum. They are often the most prominent and eye-catching part of the design. You’ll want to mix ribbon widths, textures, and colors to create a dynamic look. Here’s how to do it: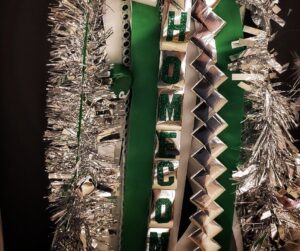
1. Cut the Ribbons: Depending on the size of the mum, you’ll need to cut several strips of ribbon. For a typical mum, ribbons are cut to about 3 feet long, but you can adjust based on how long you want them to hang. You’ll want a variety combination of wide satin ribbons, thin curling ribbons, and textured ribbons.
2. Arrange the Ribbons: Lay them flat and group them based on color or type. Consider alternating colors or layering different textures. Once you’re happy with your arrangement, use hot glue to secure the tops of the ribbons together in a bundle.
3. Attach the Ribbons to the Backer: Attach your ribbon bundle to the backer underneath the flower. You can use glue and staples to attach the ribbons firmly.
Step 4: Personalize with Names and School Spirit
Now that you’ve laid the foundation for your mum, it’s time to personalize it with names, initials, and other details that make the mum unique.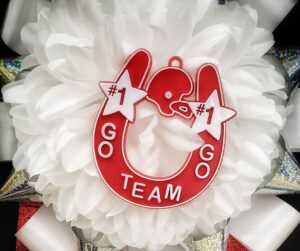
1. Add Names: Use adhesive lettering or stencils to spell out the student’s name, their date’s name, or initials on some of the wider ribbons. This adds a personal touch and makes the mum feel special.
2. Incorporate School Spirit: Here, you’ll want to add charms, stickers, and symbols representing the student’s school or interests. Many use football charms, school mascots, or miniature instruments to showcase sports, band, or cheerleading activities. You can also add small bells or beads for extra flair.
Step 5: Embellish with Fun Additions
One of the best parts of making a homecoming mum is the fun of adding embellishments. You can get creative here, making your mum as elaborate or as simple as you like. Some popular mum embellishments include:
Bells and Whistles: Literally! Small bells and tiny whistles are often added to mums for some sound and fun.
Stuffed Animals: For an extra playful touch, attach a small stuffed animal, such as a bear or school mascot, to the mum.
LED Lights: For those looking to go above and beyond, adding small, battery-powered lights can make your mum stand out, especially at night events.
Glitter and Rhinestones: Use these to add some sparkle to your ribbons or flowers.
Step 6: Attach a Safety Pin or Ribbon Loop
Finally, you need to make sure the mum is wearable. Most mums are worn around the neck, but some students prefer to pin them onto their clothing.
1. Attach a Safety Pin: Use a large safety pin or brooch pin to secure the mum onto a shirt or dress.
2. Add a Neck Ribbon: Alternatively, you can attach a wide satin ribbon to the top of the mum to create a loop for wearing it around the neck.
Make sure everything is securely fastened to prevent the mum from falling apart during the homecoming festivities.
Step 7: Showcase Your Masterpiece!
Now that your mum is complete, it’s time to display your work proudly! Whether you’re giving it as a gift to a homecoming date or wearing it yourself, your mum is a symbol of school spirit, creativity, and tradition. You can take pictures of your finished creations and share them on social media, showing off your masterpiece.
Making a homecoming mum is more than just crafting—it’s a way to celebrate school pride, creativity, and community. With the right materials and a little imagination, you can create a beautiful, personalized mum that captures the essence of your homecoming experience. Whether you go for a classic look or an over-the-top design, remember that the true spirit of the mum lies in its symbolism and the joy it brings to students during this special time of year. So gather your supplies, get crafting, and enjoy the process of creating a homecoming tradition that’s uniquely yours!